Wednesday, January 31, 2018

Unicorn card

I signed up to do a unicorn card swap in one of my groups:
I layered some clouds, added the unicorn, the sun sticker and the 'sparkle' sticker. After taking this picture, I layered the 'sparkle' sticker on some white paper to make it stand out better.
Here's what my partner sent me:
 Inside it says 'all i could find is this unicorn poo' with a poop emoji in unicorn colors. I'm not a fan of the poop emoji, I'm not sure I know anyone who is, so I don't really know what I'll do with this card. It's cute, though.
She also sent me some extras:
I really love the bookmark.

Thursday, January 25, 2018

Screw It and Do It Challenge

I participated in another Screw It and Do It Challenge. I did it mostly to make sure I did something creative while I was wicked busy with my three jobs, I'm no sure it was such a good idea. Basically, you make yourself be creative for 10 minutes a day. There's a little video they make you watch, and I love how she says we have 10 minutes in our day to be creative, when I worked my 12 hour days, I had 10 minutes but I didn't want to spend them creating, I would have rather gone to bed.
Day 1:
 I really wanted to use the "C Christmas" but I also wanted to use the heart paper. So, I used the heart paper as the background, added the red snowflake paper and the 'c' paper. I also added the gingerbread houses as another focal point.
Day 2:
 I used a couple snowflake scraps and a valentine paper for a background. The love banner is from a swap. The minion is a Christmas tag, I put a heart over the package to make it less Christmasy.
Day 3:
 I used some scraps from a recent explosion box for the background. I added the Christmas tag with a clear sticker and some circle stickers.
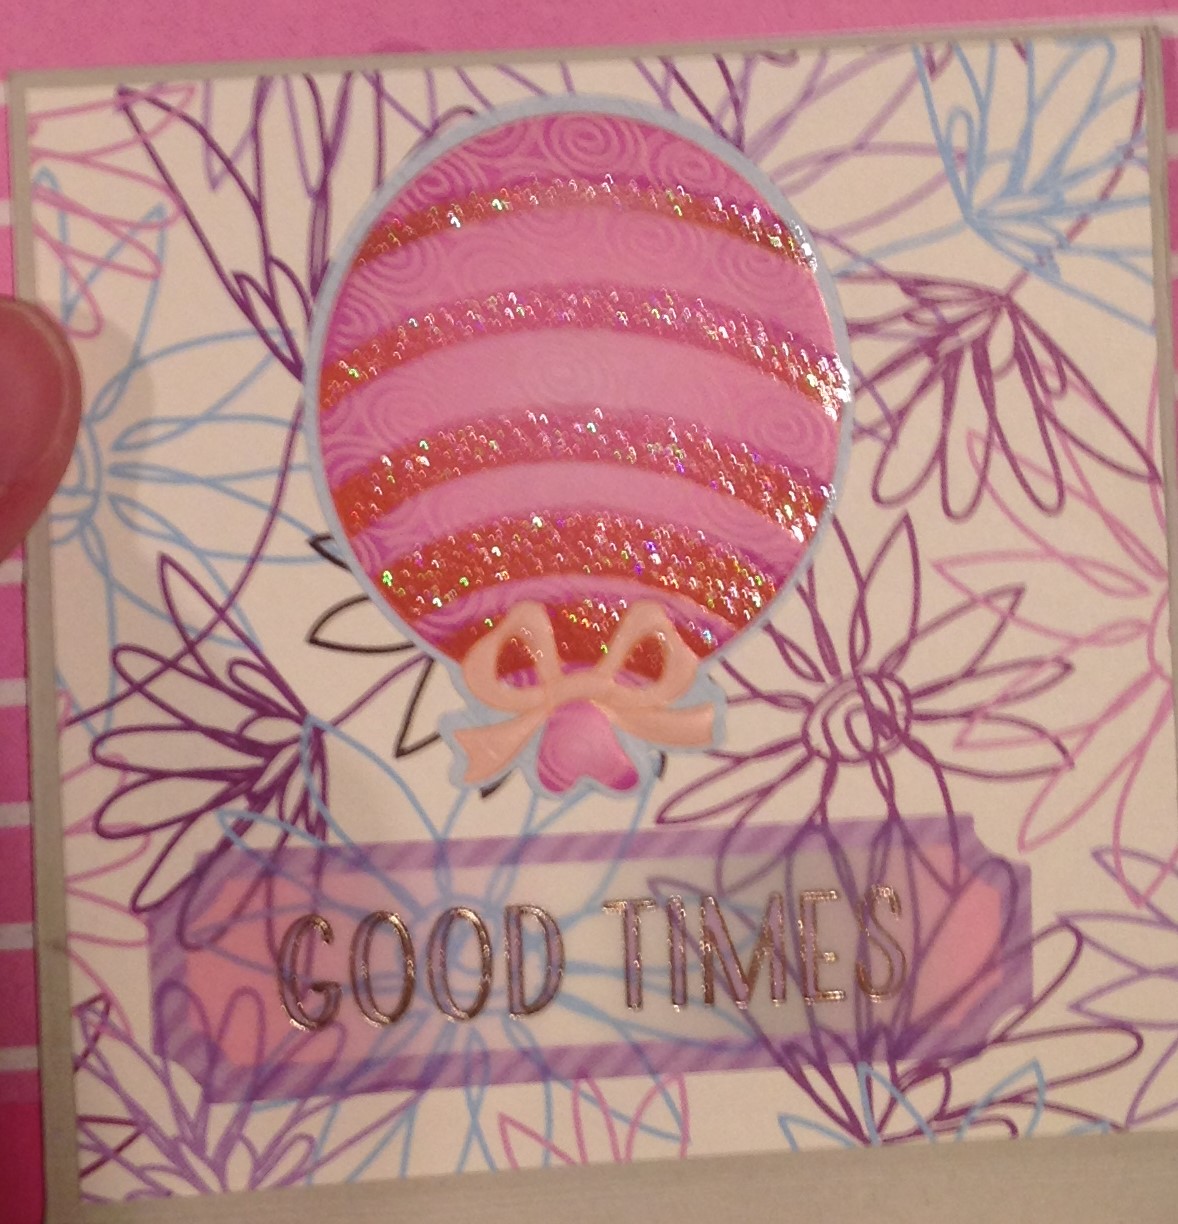
Day 4:
 This is an altered vellum bag. I added some pink paper for the background with some flamingo paper. The 'find joy in the ordinary' piece with foam tape. I thought it needed a little more, so I added the jewel butterflies to the bottom.
Day 5:
 I'm going to make this one into a card front. I used a scrap from an explosion box for the background and added some layered flowers I got in a swap.
Day 6:
 This is a mini loaded bag. I put some flower paper down as the background. To cover the sides I added some floral washi and some scraps from packing. I added the heart doily and the Valentine's paper.
Here's the other side:
I used the same paper for the background as I did on the front. You can see the floral washi better here. The 'sweet' is a sticker from Hobby Lobby. I cut the cupcakes from some more Valentine paper and added them with foam tape.
Day 7:
This is another vellum bag. I added another scrap from an explosion box, a 3D cake sticker and some balloon ephemera.
 Day 8:
I was not very motivated this day. This is another page in my notebook. I covered the background with some lined paper left over from another project with some balloon paper and some alligator stickers.
 Day 9:
This day, I made a couple 3x3 cards. the backgrounds are some leftover paper, as is the pink paper. The top one has a fairy clip art from a swap. I added some blue pom pom trim with sparkly white trim on top. The bottom card has a girl I cut from some paper.
 Day 10:
This one is actually the front of a gift card holder. The background is scrap paper. I liked the look of the chipboard arrow through the burlap heart. I added some heart stickers to the mason jar piece and added the 'sweet love' sticker to the corner.
 Day 11:
Another vellum bag. I already had the 'snow globe' made from another time. I used some polka dot paper for the background and added some red washi tape and the snow globe.
 Day 12:
This will become another card front. I used some embossed paper for the background with a scrap of zig zag paper. I also added a journaling card and some white cardstock. The flower pieces are stickers as is the felt bunny from last year.
 Day 13:
This is a card for a swap. I layered some cut out clouds on top of the background paper. The unicorn is from a swap, I added the sun and the 'sparkle' sticker.
 Day 14:
Another card. I tried the washi technique with a tube of washi I picked up at Hobby Lobby. The 'happy valentine's day' are also stickers from Hobby Lobby. The heart is an acetate piece I bought online.
 Day 15:
This one is a mini pocket letter for a swap. I layered some paper and added unicorns and stickers.

Winter Blues Pocket letter

I stepped in to make a winter blues pocket letter when someone wasn't able to fulfill their commitment. Here's what I created:
 I used a background of blue polka dots. I went with more of a snowman/blue theme. I admit I saw the words winter and didn't read the rest of the information, I went to look at it and realized that yes I was supposed to do a blue theme.
First row, first card: a foam snowman and some snowflakes that are like wood. Second card: some snowman paper with a sticker of a quail (maybe? I don't really know), I added some snowflakes on foam tape on the outside of the pocket as well as a border sticker that says "frosty chill of a winter's day". Third card: a felt snowman sticker with some banner pieces from an ephemera kit.
Second row: First card is a vintage photo printed off my computer with some blue snowflakes and a sticker that says 'chilly'. Second card: has a snowman on top of a snowflake with some snowflake stickers. Third card has a bunch of snowflake stickers with a tree.
Third row, First card: has a house sticker with a snowman button and a jewel snowman, I also added a snowflake sticker. Second card: I layered a blue piece of paper with a snowcouple sticker and some snowflake stickers. Third card: this is a playing card with some snowflake stickers and a sticker that says 'wintertime'.
Here's the back:
 I included a bunch of blue ephemera winter stuff, some snowflake stickers, some of the word stickers I used, some snowflake sequins, blue flat back pearls and clear gems, some tree/moose punches, some snowmen clip art.
I also included a blue pair of socks and some Frozen shaker stickers.
Here's what my partner made:
 And the back:
 The goodies:
 I love the snowglobe stickers I have been looking for them for awhile.
She also made me this gorgeous tassel:
 And some extra goodies she included in the envelope:

Saturday, January 20, 2018

Explosion box

I made another one:
Outside:
I used a blue cardstock base for this outside box. I used one piece of beige 12x12 cardstock for all the lids. I put a piece of paper that has the Happy Birthday song on the top with a felt snowflower and this beautiful pipe cleaner flower I got in a swap. I also added some Dollar Tree banner washi to the lip of the box. This person likes nature, so I added some bird paper to the outside of the box.
Opened:

 I used rock paper for the inside pieces here. For this square, I used this journaling card cut down, it's popped up on foam tape on top of some pink paper.
 I just cut down another journaling card for this one.
 I added a Dollar Tree sticker to this one.
 This is part of a sticky note pad from Dollar Tree, I tacked it down on a piece of cardboard.
Second box:
I covered the top of this box with the same bird paper as the outside of the large box. The Happy Birthday stickers are clear that I layered on some cardstock and popped them up on foam tape. I also added the cake sticker. I used some flower washi on the lip of the box. I covered the outside of the box with some blue paisley paper.
Second layer opened:
I used some dragonfly cardstock for the base of this box.
 For this one I used another clear happy birthday sticker, it's layered on another scrap of paper. I added some puffy dog stickers.
 This is just flower sticker.
 This one has another clear flower sticker on it with a 'celebrate' word sticker.
This last one has a 'take a break' sicker with a clear flower sticker on the bottom.
 I covered the lid of the last box with scraps of the same paper as the base of the second box and a quote. I covered the outside of the last box with some succulent paper.
Here is the last box opened:
 I used a sea foam green cardstock for the base of this one. I took the squares from the second box and cut them down to fit on the smallest box. It was a double sided paper, so I just used the other side.
 I layered a clear sticker on this one.
 I cut down a journaling card for this one.
 These are two stickers from the same sticker sheet. The friendship piece was actually one sticker that I cut down to fit the square.
This one has a layered sticker on it.
The last box was shown to the director of the library, and she asked me to make one for her friend. Her friend likes nature, flowers, cats, dogs, poetry and dragonflies. I hope she likes it.
I really want to make one for a crafty friend and fill it up with crafting supplies, I might do that for a swap I have coming up.

Saturday, January 13, 2018

Another explosion box

When I showed my explosion box to a co-worker she commissioned me to make one for her niece.
close-up pictures,
Outside:
 For the lid I put some circle paper as a background and cut the top piece from a journaling card. I covered the lip of the box with Dollar Tree cupcake washi. I added some birthday candle paper to the outside sides.
First layer opened:
Close-up of sides:
 I basically covered them all in this striped pink paper. I added this clear sticker to one side.
The other three sides I added some gymnastic stickers, my co-worker said her niece liked gymnastics.


 Here's the second box outside:
 I covered the top of the lid with this valentine cardstock, and spelled out 'make a wish' with stickers. I added some holographic washi to the lip, and some birthday cake paper to the sides.
Second box opened:
Close up of sides:
 I covered them with this flower paper. I added the 'good times' sticker and a balloon sticker.
 This side has a couple of kids from a journaling card.
 This side has a scrap of the birthday cake paper with a 'happy birthday' sticker.
 This last side has some candles with a 'blow out the candles' sticker that I cut apart to fit it on the side.
Inside box:
 I covered the top of the lid with pink paper and some stickers. I covered the lip with that pink striped paper and the lyrics of 'happy birthday'. I added some birthday word bubble paper to the sides.
Last box opened:
I realized I didn't really take a picture of the inside box open. 
I covered the sides with this circle paper.
 And added some stickers on each of the sides.
 this one has a 'celebrate' sticker and a cupcake sticker.
 this one says 'stay curious'
And the last one says 'hopes & dreams'
My co-worker loved it. She showed it to our director, who commissioned me to make one for a friend.
I'm loving doing these. I see more in my future.