Thursday, November 30, 2017

Look What I Made

I signed up for a swap on Facebook where we bought something at Dollar Tree and altered it and then sent it to our partner.
I decided to alter a composition notebook.
Front
 I covered the spine with some burlap ribbon, and the covered the raw edges of that with a vintage trim. I just covered the front with a scrapbook paper (garage sale) that had the tree on it, it's got a velvety texture to it. I added the butterflies (Dollar Tree) because it just looked too plain.
Back:
I chose this patterned paper because the other side has a pattern that sorta matched the blue under the tree, and then I attached it on backwards. I added some die cuts (RAK) so it wouldn't be so plain and some star bling (Dollar Tree). I also realized I attached the vintage trim backwards, but it doesn't look that bad, it's probably not even noticeable until I pointed it out.
After my partner decided not to send to me, and just accept her 'free' gift, another person stepped in and helped out. Here's what I got in return:
 She altered a picture frame and made it a shaker with a quote. Sadly the reindeer did not make it attached to the frame, but I have glue, no big deal. I love shakers, it makes my day.
She also included some cute puffy minion stickers:

Saturday, November 25, 2017

Winter White pocket letter

I signed up to do a winter white pocket letter, basically a white pocket letter to do with winter with maybe another color.
Here's what I made:
 I used a 'snow' paper for the background, added some silver washi to the side and some lace to the bottom of all the rows. I added a couple white felt trees and a bunch of snowmen. Most of them were stamped, the second row first card is from a clip art book, the bottom row middle card is made from mother of pearl buttons.
The goodies:
There's no letter in this one because it went to the same person I made the file folder pocket letter for, I mailed them together. I included some of the lace I used on the front, band aids (I've seen people do this, so I thought I'd try it out), more paper clips, buttons, stamped images, stickers, cupcake papers (large and small) and some earrings.
Here's what my partner made me:
 She used the tags from the Dollar tree.
The goodies:

Friday, November 24, 2017

Christmas file folder pocket letter

I signed up for another file folder pocket letter because they are so fun to make.
Here's what I made:
 I covered the front with plaid paper for the background and this large Santa. My original thought was to have a large Santa on the front, but I couldn't find one I liked. I was in Dollar Tree the other day and saw this one on a large gift bag and thought it would work great.
Here's the inside:
 I took some scraps to cover the the inside. I liked the look, but now looking at the picture, I feel I should have covered the whole inside of the file folder. I added this gift bag also from Dollar Tree as the inside pocket, I thought it'd be more fun than a regular glassine bag.
The pocket letter:
 I put some die cut ornaments I got in a swap on some paper and cut it up to fit the pocket letter, there were some empty spots that I added some stickers too. I also added the santa washi to the bottom:
The goodies
 I put a letter in that blank spot, there's stickers, sticky notes, washi, stamped images, paper clips, sequins, tea and some tiny felt hats.
Inside back of the file folder:
 I never know what to do with this, I just covered it with paper and attached the sticky notes.
Back:
I love how this paper looks on here, I'm not a huge fan of the paper itself.
Here's what my partner sent me, front:
 Inside:
Inside back:


Sunday, November 19, 2017

Pocketful of Sunshine

I signed up for a pocketful of sunshine swap, basically we were to make a loaded envelope full of sunshine, or yellow items, we were to include ten items. I had started to make this flip book for the swap that required us to include 4 things from other swaps, and then realized almost all the pages were yellow, so I knew I had to use it for this swap.
 I had a bunch of yellow paper that was cut down to 4x6 for a swap, so I used that for the base. This is actually a journaling card, I added a heart sticker (swap) and some star stickers (swap), they are all gold and glittery and foam. I bound the book with some yellow washi (RAK).
Here's the first flip:
 Close-up of left page:
 I added a clear boot sticker (Hobby Lobby) and clear flower stickers (Hobby Lobby) and cut down a journaling card for the 'you make my world sparkle' quote (Hobby Lobby).
Close-up of right page:
 This journaling card (swap) is layered on two other yellow papers (swaps), I also added some trim (swap) to the top and bottom.
Second flip:
 Close-up of middle page:
I had these cute little 2x2 journaling squares (Hobby Lobby) that I added to the page with some yellow stickers (my stash).
Close-up of right page:
I added the fairy die cut (RAK) and the 'hello sunshine' piece (Walmart).
 Last flip:
 Close-up of third page:
 I added the oval die cut (swap) and the chipboard sparkly star (swap) and the gold stars (Walmart).
Close-up of last page:
I just added this envelope (swap).
Here's the envelope:
 I admit, I'm not that great at these, this is probably the 2nd or 3rd one I've done. Basically I covered it in this chevron paper (Hobby Lobby), I couldn't get it on there right, so there's a lot of wrinkling. I did the whole roll down of the top, I'm also not great at that, I might do something else for the next one I have to do. I know a lot of times, people use the terms loaded bag and loaded envelope interchangeably, but if they say loaded envelope, that's what I'm making. I also didn't have quite enough paper in my 12x12 sheet to cover the whole envelope (probably because it went on crooked), so I had to add a strip to cover up a bare spot. I flipped it over and used the back as the front. I added the pocket at the bottom (swap), and the 'you are awesome' journaling card (RAK) to the bottom here. I added the teacup die cuts (swap) with foam tape to give them a little dimension. I ripped a little of the bottom of the 'v', so I added the butterfly (swap) to cover that up, I also added the pinwheel (swap) to the top.
The back:
 I just fussy cut these flowers out of another paper to cover up all the wrinkling on the back.
Here's what I included:
 The flip book, a pencil, a wand I made, an 'Oh Henry' bar, an emoji sucker, some flowers, sequins, die cuts, lace and acetate pieces. I tried to have some crafty stuff and some fun stuff.
Here's what it looked like all packaged up:
It barely fit in the box, I put it in, I sprinkled a bunch more of those yellow flowers all over it. My partner was very surprised that I made the loaded envelopes to put all the goodies in, apparently we were just supposed to send the goodies.
Here's what I got from my partner:
I don't know if you can tell, but the papers in the back are embossed. I love that, it's almost as fun as getting die cuts. My favorite pieces are the giant chicken, the smaller felt chickens, the angel fish and the bunny borders.

Saturday, November 18, 2017

Owl pocket letter

I signed up to do an owl pocket letter in one of my facebook groups because I have way too many owls and I never seem to use them.
Here's what I made:
 I chose a pretty plain background paper (Hobby Lobby) and a bunch of owl stickers (Dollar Tree, Hobby Lobby, RAK) and a bunch of cactus stickers (Walmart, Hobby Lobby). I was thinking I should use two of the things I seem to collect and never use. I normally would not pair owls and cacti together, but I think it turned out cute. I also added some gold word stickers (Dollar Tree). I added some owl washi (swap) to the side.
The back:
I always try to add some of what I've used on the front, so there's a lot of owl stickers, and owl washi and those gold stickers, and also some tea.
Here's what I got from my partner:
 And the goodies:
I don't think I've received the ends of sticker sheets of what my partner has used before. Nothing was in the pockets, so I don't know if they came out in the mail, or it was mailed that way. She mailed it flat.

Thursday, November 9, 2017

Mini Hedgehog pocket letters

I signed up for a mini hedgehog pocket letter swap, because hedgehogs.
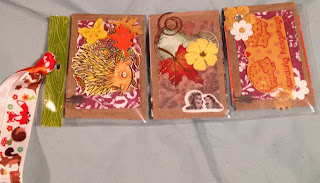
I don't have separate pictures for each pocket letter. I try to sign up for three when I do mini pocket letters because it's easier because you have to cut up a regular pocket letter sleeve.
So, I used a fall leaf paper as the background, and made them all about the same, but slightly different. I used the metallic dimensional pumpkin stickers (Hobby Lobby) with a hedgehog from a sticker pack (swap), some mushroom stickers (Dollar Tree), some more hedgehog stickers (Target), some gold word stickers (Dollar Tree) and a stamped hedgehog image (Stampin Up). One reason I signed up for this swap is because of those Stampin Up stamps, I bought them years ago because they are hedgehogs, but I find them hard to stamp because of all the detail in them.
Not enough people signed up for me to have three partners, so I got two, here's what I got in return:
 The goodies:
 I love the paper clips and the hedgehog images.
 I had to take a picture of the back, because she made each card into tiny envelopes and put her goodies in those.
What I got from my other partner:
 The goodies:
How cute is that hedgehog reading a book, and the create your own fish bowl sticker set?

Sunday, November 5, 2017

Fantasyland flip book

I signed up to do a fantasyland flip book in one of my facebook groups. Here's what I made:
 I used some paper I got from Hollar for the backgrounds, this fairy is a wall sticker from Dollar Tree.
When you flip it open
 Close-up of left page:
 This paper was from my stash, the purple flowers are from a unicorn wall sticker pack from Dollar Tree. The fairy is from a swap, I colored it with gel pens.
Close-up of right page
I added a unicorn to the background (Dollar Tree) and some punched butterflies (a swap), I also added some bling as their bodies (my stash).
When you flip it to the right:
 Close-up of middle page:
 The flowers and leaves are from the fairy wall sticker (Dollar Tree), I added lace to the bottom (garage sale) and some puffy fairies and a toadstool house (RAK).
Close-up of right page:
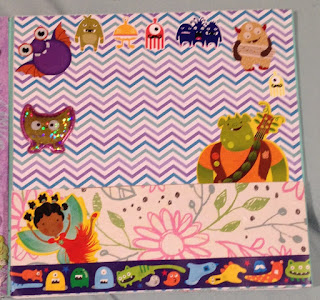
 I chose monsters for this page. I added half of a journaling card (a swap) for a pocket. I have a lot of monster stickers that I never seem to use. I fussy cut the purple guy (Dollar Tree), added some tiny ones (Walmart) and the kraft colored one (Walmart) as well as the puffy yellow guy (Dollar Tree). I added the ogre to look like he's peeking out of the pocket (Micheal's), I also added the fairy to the pocket (Micheal's). I added some monster tape (Dollar Tree) to the bottom.
When you flip this page to the right:
Close-up of third page:
 I added some rainbow tape (Dollar Tree) to the bottom. I had put the purple unicorn (TJ Maxx) on the bottom first and then decided to add the tape, so one of his legs is sad. I added the pegasus (Dollar Tree) to the top as well as the 'Best Day ever' sticker (Hobby Lobby), it's a clear sticker, so I put it on white paper before adding it to the page. I also added the two small unicorns (Micheal's) to the bottom.
Close-up of right page:
 I added layers of the paper on foam tape to make waves. I put the blue haired mermaid (Dollar Tree) behind one of the waves. I also put the pink haired and purple haired mermaids (Hobby Lobby) so they are partly behind and on top of the layers. I then added the two mermaids (a swap) to the bottom. I also added a sun sticker (TJ Maxx) to the top. I was going to put a few mermaids in behind the top wave, but I forgot.
Here's how I packaged it:
I wrapped some fibers (a swap) around the book, tied them in a bow and added a unicorn charm (garage sale) and a couple unicorn paper clips (swaps). I also included another of the Dollar Tree fairies in the back for my partner.
Here's what I got in return:
 I love the style of this flip book, it's like a bunch of mini file folders.
First flip:
 Second flip:
 Last flip:
 And the goodies:
I really like all the printouts she included.