Thursday, April 28, 2016

Flip Book #2

 I finished my second flip book and it is on it's way to my penpal. Linda Curl if you are reading, STOP NOW!!!!!


Here is the cover:
 I started with the background paper that is double sided, it's green on the back. I had the hardest time figuring out what to put on top of it. Apparently I'm not great at layering things on top of patterned paper (I'm also not good at doing things on a larger scale than 2.5 inches by 3.5 inches, so I'm trying). The frame is a canvas that I got in a swap, the flower is acetate and from some mix I bought. The 'ric rac' is actually a sticker I bought in the Target dollar spot at Easter time. I used it a lot on this book and in a pocket letter I just finished. I wish I had bought more of them. The lady bug is shiny and dimensional. The washi tape is scotch brand, it's blue/green, I got it on clearance at Target for 88 cents.
 This is what you see when you open the cover:
On the left, I used some patterned paper to make a pocket (and it kinda failed, it came unstuck part way through making the book, so I just put a flat sticker in it, any suggestions on how to make my pockets more durable?). I added some Tim Holtz grungeboard letters that I inked up with a pink dye ink pad. The 'bliss' is a rub-on that came with a springy set. The ladybug is just shiny.
On the right, is another piece of this double sided paper. I layered a white and pink piece of cardstock on top. The 'journey' was in my stash, I have no idea where it came from. The flip piece matches the pocket on the left. I added a 'good times' sticker with an owl sticker on top. The owl sticker was from Dollar Tree. The blue polka dot washi is from a set.
Here's what happens when you flip open the right side:
The middle has a tiny envelope that I taped down, and added the thin washi on top of. This washi seems to have a hard time staying stuck on things, anyone else having trouble with it? It's really thin, and came in a pack with three other black/brown washi from Hobby Lobby for $3.99. The ladybug and flower are from the same sticker set. I added some brightly colored tags to the pocket. The ladybugs on the background match the ladybug on the front cover. 'Happy' is in pink sparkly alpha stickers. The 'create' is from a swap. The background was part of the papers I stuck together for my last flip book.
On the right, I have a flower from a notepad. The butterfly in the corner is a puffy sticker framed in a metal frame that has pieces that poke through the page and you bend them over to affix it. The 'sweet' is a sticker. The flip page is from the same paper stack as the middle background. The washi is a green leafy. The bottom has yellow polka dot ribbon and green polka dot ribbon.
 This is a close up of the second page:
 And here it is with the flip, flipped up:
 I added a label with another owl sticker from the same set as the above one. These labels came in a pack that had travel stickers, the owls are hiding a 'postmark' stamp. Sadly these labels didn't stick well, so I had to glue them down.
Here's the next one flipped up:
Again with the labels and owl stickers. The washi are a pink with script and a green polka dot.
Here's a close-up of the middle back page:
 Here's a close-up of the last right page:
 Here's a close-up of the flip flipped up:
You can see the stickers that I put in the pocket. I added some chevron pieces on the sides, I just thought they were kinda boring.
The bottom is another of that paper pack as the top flip. the green piece is actually two paint chips, I added a 'spring' rub on and a polka dot sticker. I added some pink flower stickers to the top.
Here's the back:
Very boring. I did add one of those travel labels and added handmade by me.

I really like flip books but I think I'm trying to make them much more complicated than I should. I've only made these two, but I want them with all the extras that people who have made more have. I posted the other day on facebook, that I'm not great with bright colors, and this is the second colorful flip book and I finished a pocket letter the other day that's very colorful. Part of that is, I had the supplies out on my floor and instead of pulling more out, I used what was there.

I need advice on adhesives. I used tape for the pockets on my flip books, but both of them fell off shortly after finishing the book. I think I'll glue my next ones on to see if that makes a difference. I'm also wondering if I'm trying to put too much in the pockets. My first one was a corner pocket I put paper clips in. The other one is on this flip book and I tried putting a thicker tag in it.
I'm also having trouble with some of my washi sticking. Like I said the really thin stuff doesn't seem to be sticking too well. I haven't used it to attach things, just as an accent. Sometimes some of my other washi doesn't stick very well either. I'm wondering if it's cheaper washi and I should stick to the higher quality stuff.

Also, I bought some really cute duct tape to decorate my packages when I sent them out. I love it, I'm not sure if I should count it as a necessity though. Anyone who's gotten my packages with this tape, do you think I should continue doing this?

Wednesday, April 20, 2016

Flip Book

I finished my first flip book the other day:
I started by gluing some 6x6 paper back to back, bright and patterned paper aren't really my thing, but that's what I had.
I used a flowery green washi tape for the edges, I used some very thin chevron tape to frame each page (until I ran out further in and used diagonal tape) The top piece is lined like notebook paper and raised on foam tape. The letters are puffy. The banner at the bottom is from a canvas frame. The pocket in the corner has a chipboard flower sticker and some paper clips in the pocket.
This is the first flip:
close-ups:
On the left, is a library pocket covered with purple striped paper, a purple paper flower with a gem center and a crocheted flower with buttons. The top of the pocket has purple velvet ribbon. The birdhouse piece on the side was a bookmark. There is a tag, a bookmark and a journaling spot in the pocket.
This one has a journaling spot with a paper pieced ladybug, this piece opens up.
Second flip:
Closeups:
This is the middle piece, this square flips up, the Be Happy is from a post it notebook, the bug is a rub on.
This is the right side, there are some die cuts in the envelope, they are pieces that go with the background papers. There is a little layering on the top, and an acetate butterfly on the bottom.

It's a very primitive flip book. I'm hoping to make more sophisticated ones in the future. I picked up some 6x6 paper that is more my taste yesterday, so hopefully that will help make them easier.

Saturday, April 16, 2016

Finished Pocket Letters

I finished 3 pocket letters in this last week and mailed them out today. 
First one is sort of a vintagey theme, for Amanda:
 I added some gold/white washi tape to the edge along with some handmade beads that I got in a swap and a bird charm. I have taken out the first card because it has the recipient's name on it. The second card has a 30 cent ticket layered on some patterned paper with a shell sticker on top. The last card has some patterned paper with a SEA/starfish sticker on top.
Second row: The first card is made from cutting a tag down to size with a lacy-like heart sticker and a raised heart sticker on top. The second card has a boat stamp and a chipboard frame. The third card has brown ribbon on the sides, a playing card and a dimensional bird sticker.
Last row: The first card has a 3D pocketwatch sticker and a TIME sticker. The second card has some vintage writing paper on the side and vintage packaging. The last card is a vintage shipping tag with another boat stamp and a clear CAPTURE sticker on the bottom.
Here's the back of the pocket letter:
 I really like taking a 12x12 patterned sheet of paper and assembling the paper back together, so there is a design on the back hiding the goodies inside.
Apparently I don't have a picture of the goodies in this one.
Second letter, for Jennifer:
 As you can see there's a heart theme going on. I added black lace washi and heart stickers to the side. The hanging thing has handmade beads and some heart charms.
Again, I took out the first card because it has the recipient's name on it. The second one has a cut out of a Victorian lady with paper and pearlized heart pieces on the edge. The third card has a paint chip and a chipboard hear on it.
Second row: another paint chip and a heart/flower sticker. There is no second card, I added a metal square to the outside of the pocket and a rosette with a heart sticker to the middle of it. The third card has a printed picture.
Third row: a foam monster sticker with foam hearts. Second card, vintage trim with red jewels, a steampunk heart sticker. Last card: a shiny red sticker with a blue acetate heart piece on top.
As you can see, I added heart ribbon and a heart banner as well.
Here's the back:
 This one is purple with birds, the other side of the cards have a pattern as well, so along with all the goodies this is hiding, my partners get extra cards to use however they want.
Here are the goodies:
 some metal brads, I added some post it notes to the middle and the last is my letter.
Second row: puffy rose heart stickers, washi tape, some heart stickers
Third row: shiny heart stickers, some heart pieces, foam heart stickers.
Last pocket letter, this one came together very fast, for Cynthia:
 As you can see, there's a gold theme going on. I actually added the same gold/white striped washi as the first letter to the side. The pieces on the side are some buttons, an actual ginkgo leaf dipped in gold, and a locket.
First card star buttons with a flower button in the middle. Second card: a metal tag with a 3D pocketwatch sticker. Third card layered gold paper with a watch piece.
Second row: first card patterned gold paper with a face button. Second card: patterned gold paper with a 3D key sticker. Third card patterned gold paper with a metal frame and a paper piece.
Third row: first card flower buttons. Second card a gold tag with a gold scissors charm. Third card vintage butterfly pin with gold bubble trail.
Here's the back:
 I didn't have any great paper to coordinate, so it's just number paper.
Here's the goodies:
Waiting for the letter, some paper piece, something sparkly. Second row: washi tape, some picture tags, leftover bubbles from front of card. Third tow: key stickers, some steampunk stickers, some metal gears.

A couple things I've learned:
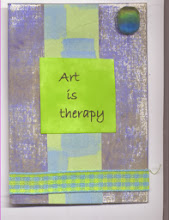
I really love making these. It's about the same as making ATCs (Artist Trading Cards), but I get to make more of them.
I'm not really good at doing 9 of them with a theme, but I'm getting better.
I love stuffing them with goodies. I have way too many craft supplies, and since I'm moving soon, it's a great way to pass onto to someone else. Of course, I will also be acquiring more, so...
I love putting the washi on the side. I don't seem to use much of my washi (I really just like to hoard it), so this is a great way to get it used (as well as sending some with my cards).
I really missed swapping. I love doing art swaps because I get to collect other people's artwork.

Tuesday, April 5, 2016

Pocket letter swap

Have you heard of pocket letters? I bet you have, I feel like I'm really behind on what's going on with the art swapping world lately. Anyways, I've read about pocket letters on a few of the blogs I read, and I've been on YouTube (which has become a horrible obsession lately) and found a bunch on there. Since I've heard of them, I've been wanting to swap with someone. Sherry of Createlogy, agreed to swap with me. I met her through A Swap for All Seasons a few years ago (and I feel I read her blog before then, but I don't know if that's true), anyway she had posted about a swap she was in and I asked if she would swap with me.
From what I've seen, I believe the pocket letter is like a 9-card swap I did in an ATC group I was in. We took the 9-sleeve protector and created a page that was cut up into 9 cards and sent to a partner. The pocket letter is a little different in that you're also sending goodies and a letter about yourself to your partner. I really liked the idea of creating again, and sending out some of my supplies to someone else.
Sherry sent hers in time for me to get it before Easter, I was not that quick, so sadly mine didn't get to her until last week, but I hope she liked it.
Here's what Sherry sent me:
 I really liked how she used a calendar page that looks like an Easter basket.
Here's the back:
 The top there is a note on a tag, the middle is a W card for my name (Wendy), the right is a bag of punches. Second row: the left is a cute little flower card with a bee, the middle has buttons sewed onto a playing card and the left has a cupcake and some beads. Last row: the left is a bag of punches, the middle is a chocolate, and the right is a little image that says art.

I was going to make some nice cohesive design, but what I plan is not always what comes out in the end. Here's what I sent Sherry:
 Top row: left, some stickers from a vintagey sticker book, the middle is a acetate design, the right is a mermaid puffy sticker and a sticker in the corner that says: It's all ok. Second row: Some polka dotted ribbon on the sides and some daisy trim in the middle, a foil butterfly and some more acetate designs, right a punch out. Last row: another acetate design, I added some Sharpie marker to help it pop, a flower with more Sharpie marker, and the right is a bunny sticker and I think the words in the corner say whimsical. I also added some polka dot washi tape to the side.
The back:
 One of the videos I saw, that Christina Betts posted, she had gotten a letter from someone who had a whole design on the back and the goodies inbetween the cards, I really liked that idea. You can't really tell, but it's a bunch of flowers. I really wanted to get this done before Easter, but I felt crappy that week, so I went with a more springy look.
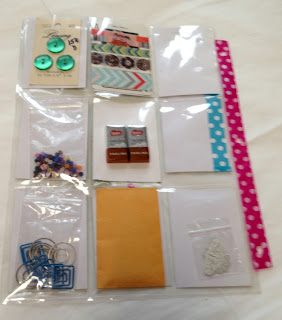
Here's the goodies:
Top row, a vintage card of buttons, some washi tape and my letter. Second row: some mini buttons, some chocolate, and (it's not in this picture, but) some charms (they would not stay in the pocket, so I had to add them later and tape the pocket shut). Last row: circle and square paper clips, an envelope of die cuts, and a bag of metal embellishments.
I hope she liked it.

I really had fun making this and I hope to make more in the future. Anyone know where I could go to find pocket letter swaps?

I really like sharing my supplies with people. I have way too many and it's fun to send them off (plus you get different stuff back). I also like the idea of decorating the side where the hole punches are with washi tape. I'm horrible about using my washi tape (I actually bought a roll just cause it was cute, I have no idea how to use it), so something simple like that makes me really happy. I also love sending some off to someone else.
I do like that Sherry sent me chocolate, I've seen in quite a few swaps that people send tea, but I don't like tea, I would never say no to chocolate.
I'd love to have a notebook of these, like I do of my ATCs (I actually have 3 or 4 notebooks of those), I love collecting other people's artwork, and think that swaps are a great way to do it.

I was just watching Amanda K on youtube and realized I didn't wrap up my pocket letter really nice. I was all flustered to get it done and out because I had already gotten Sherry's that I didn't do that. That was one of the other things I really liked, how cute people wrapped them up. I guess I was lucky I got the address right. I have a lot of envelopes that I reuse when sending things out to people, so I always have to cover up my address with something else. I usually just use an index card, but I couldn't find any of those, so I was using a piece of scratch paper, and apparently I'm really bad at getting everything on the correct lines and having fit on the paper and having it readable. I was copying from her return address label and then looked at her email and saw she had a PO box, so after having it all taped up and ready to mail, I had to do the address again.