Wednesday, August 9, 2017

Under the sea flip book

I had to make an under the sea flip book. I used a lot of blue chevron paper for the background plus a couple other underwater looking papers.
The cover:
 I had gotten this mermaid suncatcher kit at Dollar Tree awhile back for the paints, I used the suggested coloring chart for another mermaid project and finally got this painted with acrylic paint for this project. You can't tell, but the tail is kinda shimmery.
 left page:
  I used the wavy silver washi throughout the book to simulate waves. I added some goodies to a tiny pocket on this page. The envelope is from Hobby Lobby, I put a few underwater stickers on it and made a paper clip to keep it closed.
Here is the page without the goodies:
I decided to just use a bunch of shark stickers. They are mostly from Dollar Tree, the one with the heart is from Valentine's Day at Target.
Right page:
 I added some sand dollar paper from a swap and some stickers. They are all from Dollar Tree. I added another envelope of goodies to it.
middle page:
 The top flips up. I added some acrylic shells from a swap. The fish on the side are from Dollar Tree, the whale is from Michael's.
Right page:
 I made a pocket at the bottom and added some crab stickers to it. The blue one is from a garage sale, the other two from Dollar Tree. I stamped out two images of a stamp set I have from Stampin Up, it has some fish, a crab, a star fish a jelly fish and a seahorse.
 Middle page:
 I added some foam seaweed and foam stickers to the bottom, they are from a garage sale. The sticker at the top I got in a subscription box. The shaker pocket has gold star sequins, blue sequins, star sequins, and a couple sea themed buttons. The banner at the side is a bunch of sticky notes from Target.
Top:
 I used some blue green alphas to spell out just keep swimming and added a bunch of sea creature stickers.
The back:
I just framed it in this washi and added a handmade by me.
Here's what I got from my partner:


 goodies:
It's very flat. I kinda wish she had added more decoration/dimension. I wish I could do flat, I tried really hard for this one, but as you can see, hers only has 3 pages with one pocket, and is only decorated with die cuts.

Saturday, August 5, 2017

Screw It and Do It Challenge 2, week one

I signed up for the Screw It and Do It Challenge on one of my groups.
Day 1:
 I again, decided to go with the index cards. This one has a bunch of scraps as the background. The foam stars are from Goodwill, the felt flower is from Hobby Lobby, the 'hello' sticker is from my stash as is the dog sticker, the black cording is from a swap.
I'm not that excited about this one, but the more I look at it, the more it grows on me.
Day 2:
 Again with the scraps for the background. The clock is from a project life card from Walmart, the frame is a resin like frame it was originally a baby sticker from Hobby Lobby, I put a piece of pink paper over the back of the frame and added an owl key from Hobby Lobby. The trim on the side is from a swap.
Again, not so excited about it.
Day 3:
 The wavy sparkly washi is from a swap. The firework paper was leftover from a patriotic pocket letter. The heart is from a calendar page. The white star sequins and the gold star sequin are all from a swap.
I like this one except for the washi on the side.
Day 4:
The chevron paper is left over from an under the sea flip book. The top blue is actually some skinny washi from a swap. The blue flower is from a swap, I just added a handmade embellishment (also from a swap) on top of it. The pink flower is a die cut from a swap, I have no idea where the white flower came from. The bee is a sticker from Hobby Lobby. The 'wonder' is a sticker from my swap.
I like this one.
Day 5:
I bought a small notebook and have decided to start doing these in there. The background paper is magenta foiled with tiny black cacti all over it, it was used as an address label on a package. The cake I had printed out last July for a birthday flip book. The hearts at the top are a sticker from Dollar Tree as is the circle.

Summer flip book

I signed up to do a summer flip book through one of my facebook groups. The cover:
 I used a yellow background and added the front of a Tim Ree card I got in a swap.
I used a lot of brightly colored patterned paper for the backgrounds, I adhered them all together with the clear scotch tape and put green washi over the seams. I've found scotch tape and stronger tapes work much better at holding flip books together than washi tape. When I folded it all up, the edges were uneven and after trimming them, they looked pretty bad, so I added some washi tape with cute sayings on them to cover it up.
 Close-up of left page:
 I went with an ice cream theme. The two big ones are sticky notes from TJ Maxx, the two cones on the left are from a summer paper kit I picked up at Hobby Lobby. The popsicles in the middle as well as the saying are from Target. The popsicles on the right are puffy stickers from last year's Target dollar spot.
Right page:
 I gave her a lot of sticky notes (you'll see more later), I got all of these in swaps. The top is a cloud, flip flops and then a set of page flags.
 Middle page:
 I used a scene on a 12x12 paper from Hobby Lobby. I got the grill kit from a swap, the swimsuit is from that same summer paper pack.
Right page:
 I kinda went with a picnic theme. The paper made me think of a tablecloth. The small food stickers are from Target. The ants are from Walmart. The bee is from Hobby Lobby. The orange is from a folder in my stash. The taco is a sticky note.
 Third page:
 These flowers are from the spring collection this year from Hobby Lobby. The washi at the bottom is from JoAnn's.
Right page:
 I just added a pocket with some goodies. I spelled out life is better in flip flops on the pocket.
Goodies in the pocket:
 The washi was some I thought said summer and what I used throughout the flip book.
The sticky notes are what I used. I made some paper clips out of that folder from my stash.
Here's what I got from my partner,
The front:
 The first flip:
 Second flip:
 Third flip:
 Very simple, but cute.

Friday, August 4, 2017

mini fairy pocket letter

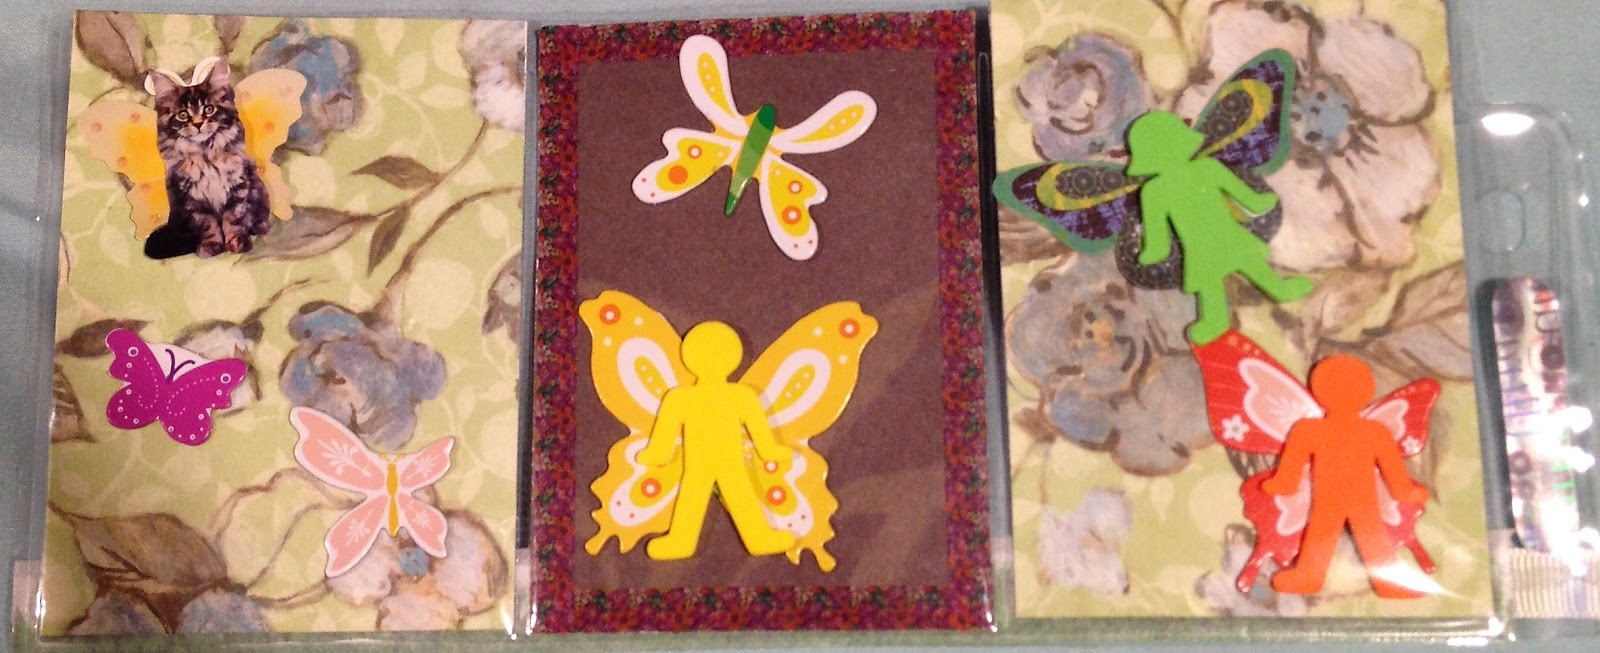
I signed up to do a mini fairy pocket letter in one of my groups. Sadly, I found I didn't have any fairy stickers or stamps, so I made my own fairies:
This is the front. I took some of my foam people I bought at Goodwill and put them on butterfly wings. I really like how they turned out. The butterfly wings are all from Dollar Tree
Here's the back:
 I added a cat fairy sticker to the first card and continued making my own for the rest of the cards. The butterflies are all from Dollar Tree.
While looking for fairy stickers at Hobby Lobby earlier this week, I found this great fairy house:
 I really wanted to buy it.
I received my return pocket letter on Friday:
 I love it. The side has a bunch of fibers on it, she used some die cuts and very cute fairy stickers.
The back:
 she used some washi on the bottom with mushroom stickers on the first card, and a cute colored fairy picture on the last one.
Here's the goodies:
She included some more of the fibers, a lot of Tinkerbell and friends fairies, another colored picture, etc.

Wednesday, August 2, 2017

Thank you card

I made a card as a thank you for someone sending me some goodies. It's pretty non traditional:
It's also really simple. I had the quote from a swap, I cut it out from the paper it was on, added it to a green background and then a purple background and a card base. I added some mint lace and flat back pearls. I also put the pearls as all the dots on the i's.
I thought it was cute.

Tuesday, August 1, 2017

Patriotic Pocket Letter

I signed up to do a patriotic pocket letter in one of my facebook groups. I wasn't going to originally, but then I got these cute kid die cuts in another swap, and thought they'd work great.
 I used some fireworks paper from Hobby Lobby as the background. The 'all american' and the two kids at the bottom I got in a swap that inspired me to do this swap. The banners I got last year at Hobby Lobby. The sparkly washi I got in a swap. I really like how this turned out, it's wicked cute.
The back:
I tried to theme almost everything to the patriotic theme. The stamps in the top corner are cling birthday stamps. I got some cling stamps in something I bought at a garage sale and I'm slowly sending them out in pocket letters. I included patriotic erasers, some sequins, some sparkly washi, some of those banners, some stickers and some diecuts in a flag pattern that someone sent me.
Here's what I got from my partner:
 I love it. I like how she didn't do it all just patriotic but added the balloons and the pinwheels and the life preserver and the W.

Wednesday, July 26, 2017

Mermaid Tag

I signed up to make a mermaid tag in one of my facebook groups.
I love how mine turned out
I used some teal wood grained paper for the background. I added the teal pearls to the top. The starfish is from a swap, I put a blue eyelet on it with some fiber for the string. The starfish at the bottom are from a sticker sheet from Hobby Lobby. I didn't like any of my mermaid stickers, they were too cartoony, so I made my own. I started with the fish scale looking paper and made a tail and then went on a hunt for a picture that fit the tail. In hindsight, I should have found a picture first and then made the tail. She was holding a child, so I cut out the child and part of her arm, I put some 3D flowers to cover her arms. I have an orange egg as her chair and then I found this 'rock' (I don't know what it is) it was in my stash and liked that as her chair better. She still didn't look like a mermaid to me, so I added the sequin 'crown'.
We had to have texture and something shiny. I feel my rock works for the texture, and the sequin crown works for the something shiny.
Here's what I got in return:
 I like the paper she used.
Here's the back:
It's a cute quote.