Sunday, August 7, 2011

Chinese papercuts

I found these gorgeous Chinese paper cuts at a garage sale this weekend.
There were two packages for fifty cents, I was curious as to what they were, and figured if they weren't anything exciting, I could always sell them online.

Inside the packagaes were these very delicate paper cuts.

They're either cut from rice paper or tissue paper, I don't know the difference, and then painted.
What you see in the pictures are the paper cuts sitting on rectangular papers. They are gorgeous.


Anyone got any ideas of what to do with them? Or want any? Let me know.

Monday, July 25, 2011

Bird Song Tag Book

Do you all remember when I made these? Well, I got my tag book in the mail today, and the tags I got are great. First is the cover made by Karla Nathan. I was perusing her book covers and loved the one she made, she said it's a scanned bird picture printed out onto a book page, and I love the tiny bird in cage charm on the bottom. Here's the front:
The back is a nice piece of wallpaper, here it is:

The first tag is made by Debbie. It's cute that Debbie's seems to focus more on the girl, but still has the bird element on it. I also love the velvet trim and the cute pink bling at the bottom. Here's the front:

And the back:

The second tag I have is unsigned, so if you know the artist, please let me know. I love the little crocheted flower on the bottom. Also, I don't know if you can tell that much, but there's a very nice layering of blue glitter all over the tag. Here's the front:

And the back:

The third tag is made by Glenda Bledsoe (no blog). On the back, it says she took the picture of the hummingbird, I'm amazed it sat still long enough for her to capture it. I also love the flower punches. Here's the front:

And the back:

The fourth tag is made by Alveen. I love the 3D birdhouse with the pearl trim and the paper flowers at the bottom. Here's the front:

And the back:

The fifth tag is made by R Flowers (no blog). I love the punches on this one as well. Here's the front:

I really like the little jewel butterfly on the back, here it is:

The sixth tag is made by Karla Nathan as well. That bird with the blue head looks like he's a little annoyed at something. I love the egg and the bling on the top. Here's the front:

And the back:

And the last tag is made by Regina (no blog), here's the front:

I love the layered eggs on the back, here they are:


Thank you ladies for making these, I love my book. Thank you also to Karla for hosting. I have always thought about joining one of Karla's tag book swaps, but always figured my style of art wasn't good enough, but I think I will join again in the future.


The other day, I was at work and someone donated a gorgeous book of bird images, I bought it today, now I can make a lot more bird tags.

Wednesday, June 29, 2011

I've been making bugs!

I bought a bag of pom poms at a garage sale last week, and wasn't sure what to do with them. After remembering a caterpillar I made with a bug kit, I decided to do more. Here's what I have.
The red and white one is the one I made from the kit. They still need eyes and some kind of antenna, but I think they are way too cute. I'm thinking of making the really small ones into pins and adding them to my Etsy store. Unfortunately I have no idea what to do with the rest, any ideas?

Tuesday, June 21, 2011

Birdsong Tag Swap

I joined Karla's Birdsong Tag Swap last week, here are my tags:
They are made out of chipboard thickness file folders. I bought them at a garage sale, the backgrounds are blue (you can see the backs in the next picture). I first covered the background with some green tissue paper. The trim on the bottom, I had bought at a garage sale and painted it with watercolors. I then added the turquoise tickets onto the trim. The bird images are stamped onto white cardstock and painted with watercolors. The leaf trim I got in a swap. The flowers are rub-ons with gems added as centers. The flower petals at the top have been painted with watercolors as well.
Here you can see the material I used for the tags. It's chipboard thickness, blue and glossy. I added a dictionary definition of bird (there is a sparrow and blackbird definition as well, because I ran out of birds). The bird picture is also out of a dictionary. I put the information from the swap on the back (name, hostess, date, my name, and my website). I realized after labeling them all, I had accidentally put my other website on them, oh well.

I made 9 tags, even though the swap only calls for 7, I found out I could get 3 tags from each file folder, so I did. I don't know what I'll do with the other 2 tags.

All the tags are similar, yet a little different. There's 3 different bird images, silver and gold leaf trim, the birds are different colors, the flowers are different colors and have different gems in their centers.

It's been awhile since I've done anything creative, so this felt extremely nice. I looked at some pictures on other people's websites, as well as the flickr album, and tried to use as many cool embellishments and trims. I don't feel mine are near as elaborate, but I'm happy with them, and I hope those that receive them are as well.

Thursday, June 16, 2011

Captured Dragon

I've been seeing these captured fairy bottles around lately, so I thought I'd make one myself, with a little twist.


I signed up for a True Colors swap, where we send our partner things in their favorite color. My partner's color was dark green, and she also liked dragons. So, I made a captured dragon bottle.


The dragon was originally a pendant, I cut off the loop at the top of his wings, and glued him to the lid of the bottle. I glued green rocks and crushed shells to the bottom. I added some gold plants to the background with some gems in front of them. Unfortunately after I glued the jar shut, some of the gems decided to come unglued, I hope she doesn't mind.


On the outside there is copper German foil on the bottom. On the top to cover the closure of the jar, I glued a ribbon, and some copper and green gems.


On the bottom, I glued dictionary pages (My new favorite decorating item), with the definition for dragon from a different dictionary. Sorry, the picture is so blurry, I couldn't get a good focused close-up.


Here's a close-up of the dragon. His wings go up to almost a point behind his head. He's holding a clear orb in his claws, and his tail goes down behind him.
I know it's not a great picture and you really can't see him that well.


I had so much fun making this. I will definitely be making more captured whatever bottles. I'm totally looking for tiny jar when I'm garage saleing. Hopefully, I'll add some to my etsy shop soon.

Sunday, May 22, 2011

Butterfly Fairy

OK, last post (don't get used to this many posts).
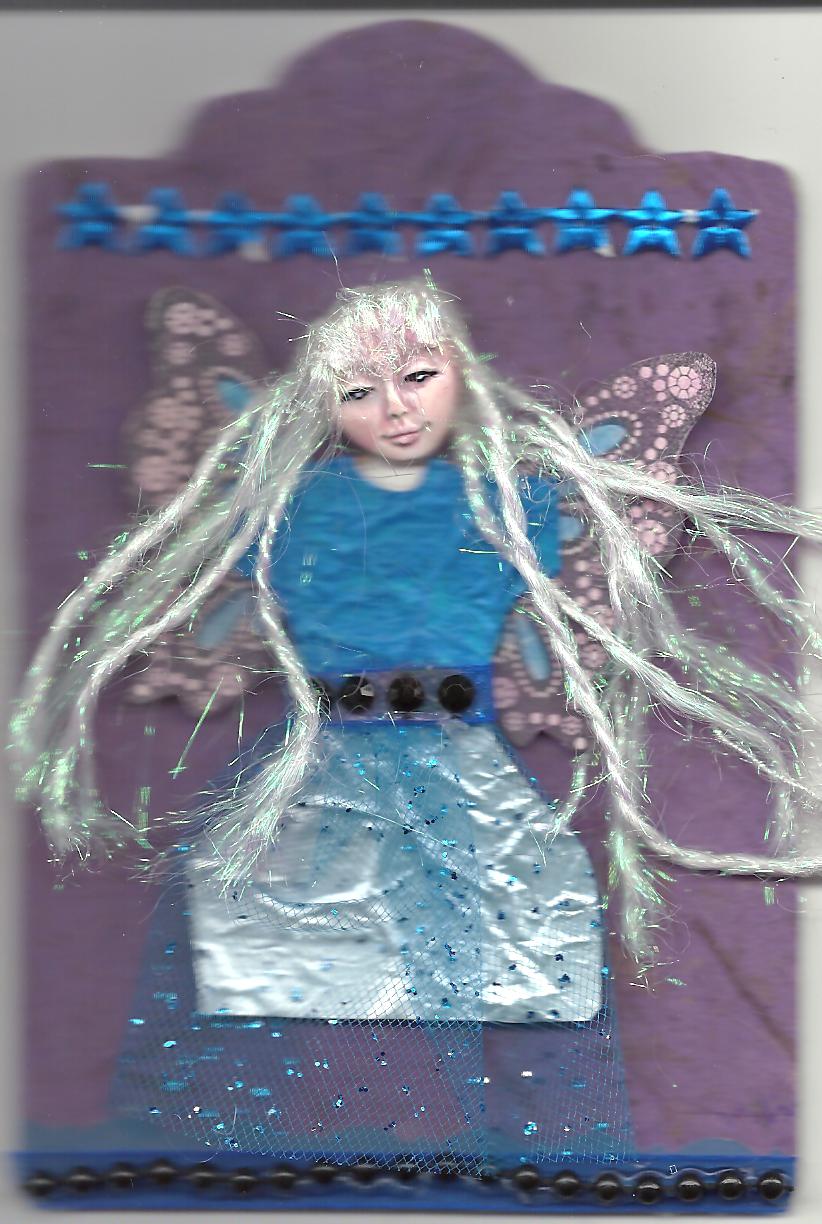
I started this project when I was doing my Gypsy ATCs, she became a piece of her own. I started out creating the dress by cutting out a dress, and then painting the top with Pearl Ex Turquoise powder mixed with mod podge so it wouldn't rub off. I added the blue filmy fabric for her dress, and then the blue ribbon around the waist and the black gems from the collage packet. The head was also from the packet and once I added that she was too big for an ATC, so I just continued making her, just to see where she went. The butterfly wings are from a butterfly stamp that I cut in half and then colored with chalk. Her hair is yarn I received from my friend, Loretta. She is mounted on a chipboard tag covered with purple mulberry paper. On the tag is a row of blue German scrap stars, and a blue edging piece layered with the same blue ribbon as her dress and some black 'pearls' to tie into the dress.
She ended up without arms or legs because nothing looked good. Now, I'm not sure what to do with her.

Any ideas?

Showing my art

Yesterday, I had some of my art pieces on display at the library. I don't have a picture of the whole table, but I do have pictures of parts of the table in succession.
This first one shows some embroidery pieces on the right, they are both in process. I think the dragon piece is done, but I don't know what to do with it. The bag still needs some decorative work done on it. Next you can see the ATCs I've kept for myself, the Outside of the Box challenge is propped up on a piece done with the Serendipity technique.
And moving right along to the left, there are more ATCs, on the top you can see a tile I decorated, 3 altered metal boxes, a framed tile made with UTEE, a frame that illustrates a William Wordsworth poem I did in high school. You can also see the bottle from the previous post and the fairy that will be in the next post.

And finishing up here, you can see a couple altered books (one done by my mother for a birthday), and the piece that won me the Hall of Fame fibers award at my senior art show in high school, a purple rosette to take to state at the county fair, and a blue ribbon at state fair (not that I'm bragging or anything). There's also business cards in the foreground. And in the background, you can see a tiny bit of a blue altered board book I was working on.


I'll see if I can find close-ups on some of these pieces in the coming days.


I showed all of this for 5 hours at the library, people could just come in and look at things as they pleased. I was part of a program called Celebrating Lifelong Creativity, along with a group that put together airplanes, a watercolor artist, a group that wrote pieces, a local senior services group, a knitting group and a paper cutting artist.