Sunday, March 27, 2016

Star Wars altered tin

Hi All, I created another altered tin this past week, though this one is much less arty and way more just putting the elements together. I made it for a friend who likes Star Wars.
I started with a tin from The Hard Rock Café that housed a watch, because the Altoids tins were a little too small for all the elements I wanted to add. Here's the top of the tin:
 I covered the tin, inside and out with black tissue paper. The two circles on the top are actually buttons I bought at Hobby Lobby, I just happened to take out the pin backs. The "Star Wars" in the middle is actually part of the packaging from the stickers I used.
Inside top:
 These stickers are actually domed. It's hard to see in the picture, but that's why Han Solo has some glare. They are clear stickers that I picked up a few years ago at Walmart. I wanted them to stand out against the black tissue paper, so I put them on white cardstock and then cut them out and glued them to the tissue paper.
Inside bottom:
 On the left is an eraser of Kylo Ren (my friend informed me it's the new Darth Vader), a Darth Vader domed sticker, he's actually on a grey background and then some foam dots to stand out next to the other pieces, and a plastic Darth Vader. The eraser was in a puzzle pack from Target and the plastic Darth Vader was in an Easter pack from Target.

Bottom of tin:
Not a lot going on here, I just added the limited edition sticker and my information.

Like I said this isn't a very arty piece. I wanted to make one of my altered tins for a friend, but she's really into older computer/arcade games, Star Wars and some more geeky things. I wasn't sure she'd really like a more artsy tin. The only thing I had that was Star Wars were the domed stickers and then I couldn't find them, so almost didn't create this for her, when I was searching for something else, I found the stickers. At that time, I had already bought the pins, eraser and figurine that I was planning to give her anyway, so it worked out.

Tuesday, March 15, 2016

Skeleton Altered tin

I altered another Altoids tin for a swap. I had joined what was called a Handmade Etsy Swap, where you bought at least one thing off of Etsy. I really wanted to alter a tin for my partner. When I found out that she really liked skulls and Day of the Dead, I was a little stumped. Skeletons and Halloween are not something I'm really that into. I have joined a couple Halloween swaps in the past, mainly to push my comfort zones and to make something. So, I dug out what little I had and it all sat on my floor for way too long.
I finally ended up with this:
 I covered the tin with black tissue paper. The front has been sprayed with a glimmer mist, I know you can't tell, but it was a teal and gold. I added the punched bones for a frame and could not figure out what to put in the middle. I originally was going to use a plastic glow-in-the-dark skull, but the glue wouldn't stick to the tin (I think it was because I was too impatient in letting it dry.). I had found this skeleton 'cameo' in my stash, pretty sure I got it in a swap and wanted to use it, but could not figure out how. The frame she is in, is from a set of wedding picks. It had a wedding cake sticker on it and I found that the cameo fit in perfectly, so I took out the sticker and glued her in. I LOVE how the front turned out.
The inside, I still love, but not as much as the front. I had painted the inside black, because I accidentally cut the paper a little too small. I really like this paper with the ghostly branches on the sides. The skeleton on the left side was originally a keychain, and I thought it kinda looked like something she had on her favorites on Etsy, so I was just going to give it to her, but that wasn't as fun. It's what got the whole tin rolling. The other two skeletons on the left side are stickers, that I carefully cut around, they did not want to stick to the paper and kept peeling off, so I finally coated it with mod podge. The two dancing skeletons were buttons that I took the backs off of, and the skull at the top is a charm I had gotten in another swap.
I didn't take a picture of the back, but it's pretty boring, I just put some skull punches and a piece of paper saying handmade by me.
My partner sent me an email saying she had gotten her package yesterday and that I "made the coolest little casket thing". I thought that was pretty good praise.

Saturday, February 13, 2016

Valentines

It has been way too long since I created anything or posted on here. I admit, I just haven't been inspired to make anything. Part of that is that my closet where I keep all my craft supplies is rather cold and my apartment temperature does not rise much over 66 degrees. I did get a space heater for Christmas, but I also haven't been inspired to make anything, I think my muse took a winter vacation.
I did want to make valentines, though. Sadly, I got a cold at the end of last week and I have been very tired because of that. But, I wanted to make some and Valentine's Day is tomorrow, and today I was working, so I wanted to get them distributed before work today.
At first, I made some valentines rocks. I don't have pictures of those, so just picture some small rocks with hearts painted on them in red, pink, purple and blue. I relearned what I learned last year, I'm not good at free-handing hearts. Even when I cut them out of paper, they turn out kinda wonky.
Anyways, I always wanted to make something more creative, but I thought I'd only get the rocks done because it was Friday night and I hadn't started anything else.
I started with some blank tags I had bought for a project in the past and chose some paper to add as backgrounds. When I was pulling out things to embellish with, I realized I hadn't covered any in red paper, so I improvised a couple. I didn't buy anything for these, at least not specifically for these.
 Starting at the top left corner:
This top row, the background is a transfer of paints, I really liked the purple color in it. The first one has a steampunk heart sticker on the top and some vintage trim layered with some purple flowers. The second one has a plaster-ish heart, it originally had the words Just Married printed on it (I bought a package of wedding picks on clearance a few weeks ago, mostly cause I liked the decorations), but I didn't like that, so I repainted it to kinda match the background, the bottom has a strip of pink paper and some hearts. The last one has a playing card back and a fuzzy heart sticker on top of it, the bottom is some vintage trim with a piece of pink ric rac.
The second row has some pink patterned paper for the background. The first one has a little girl with a tea party layered on a pink tag that I cut the top off, the bottom is part of a lace sample. The second one has a strip of painted inks and some heart buttons on top, the bottom is some trim. The last one has vintage trim with a strip of pink seam binding and a vintage "best wishes" tag layered on it, the bottom is some vintage trim with pink velvet.
 This top row is pink paper that looks like mulberry paper. The first one has a rose cut out of a card with some of the same trim as above. The second one has a face from a swap with pink seam binding and vintage trim on the bottom. The last one has vintage trim with red elastic, a girl in red picture and a rose button (I cheated a little on this one, the girl picture actually says At Christmas underneath that button, but it looked so good together, I just had to cover the Christmas part), at the bottom, I layered vintage trim and some pearls from a necklace. The first one in the second row has the pink faux mulberry paper with some of the purple paper, white paper and a cross-stitch layered on it, the bottom is pink seam binding and vintage trim. The second one has the pink patterned paper with a rose from a card, pink seam binding and three heart buttons. The last one, I layered burlap ribbon, some red/white print fabric and an old button with some vintage trim.
This last tag, really curled up as it dried, I don't think I pressed it long enough. It's a white tag covered with heart vellum, a burgundy ribbon and some vintage metal rose buttons, it has vintage trim on the bottom.

Next up is Easter. I'm hoping to create something cute for that.

Thursday, December 10, 2015

My muse returned

My muse left me for awhile. I'm not making cards this year, or gifts, or tags. I did get a little creative with my Christmas wrapping though.
 I bought some brown kraft paper for wrapping, and then I found my wrapping paper and used that up. I started wrapping my presents for friends last night, and thought it would be fun to do a little something different with it.
My original plan was to stamp on the paper, but I thought this was cuter. I added some burlap ribbon, some vintage trim and some vintage bits on top of that. I just glued the loops to each other and not the packages, thought it would be easer to unwrap.
 This one has some toile I got in a swap, I don't know if it's old, the pin someone gave me.
 This one is blue velvet and a pin I bought.
 This one is a thicker lace and a sparkly snowflake.
 I like this one the best, I think it's the most Christmasy, it's red velvet ribbon and a broken pin.

My muse did come back last week and I got sucked up in making a few patchwork quilt like pieces.
 This one is in different kinds of fabric with different shades of green.
This one I haven't sewn down yet, everything is sheer and I think I really need to borrow a sewing machine to sew it. I probably won't sew them down in blocks, maybe I'll do a little freeform stitching.

I'm kinda stuck on these two. My original thought to was to make two stockings, but the stocking background was just too big for the sheer piece. I also thought I'd make them pockets (like a stocking), but I don't know if I want to do that anymore. I wanna do some kind of embellishment on them, but I don't know what.

Anyone have any ideas?

Monday, November 2, 2015

Halloween ATCs

I'm not much of a Halloween crafter, but I was putting together a Halloween basket for someone and then some goodies for others, I thought I should include a card with them.
These were scanned so they're a little smaller than my regular photos, sorry, I'm sure you can click on it to make it bigger.
Mostly, I just added pictures to a background.
I used orange, black, purple and neutral backgrounds. I actually prepared many more backgrounds than I made cards, so now I have backgrounds for something else.
Starting in the top left corner and going clockwise: the background is orange and white striped the image is something I got in a swap, this one is my favorite; the background is black, I have no idea where I got this image; the background is white with black spots, there's three pumpkins I got in a swap last year and "Halloween greetings" at the top; the background is orange, the gold is from an Asian paper, the trim at the bottom is from a swap and the bat came with the above pumpkins; The background is white layered with a house and blood, I really like this dripping blood, but I didn't really know what to do with I; the background is black with an orange strip and a goblin on top; the background is white with black and orange fabric and a stamped cat on top; the background is purple with some washi tape on the bottom, a witch girl and "witchy woman" on top of the washi tape.

Saturday, October 10, 2015

Linen and Lace

My last post was about the cards I made for this swap.
I received my return cards on Wednesday, normally I would take pictures of these as they came out of the shipping envelope, but I picked up my mail on the way to work, and I knew what it was so I couldn't wait to open it.
Here's what I received back:
 Starting in the top left, Sherry of Createology, top right: Susanne T of No 108 Bella Vista, bottom: Pam of Virginia Retro.
Kimberly also included a bunch of Halloween stuff for crafting, I'm almost inclined to make some Halloween cards, I usually don't create for Halloween.

Tuesday, September 15, 2015

Linen and Lace

Hi All, I signed up for Kimberly's Linen and Lace ATC swap, and have finally finished my cards.
http://artjoystuff.blogspot.com/2015/08/septembers-atc-swap-sign-ups-are-now.html
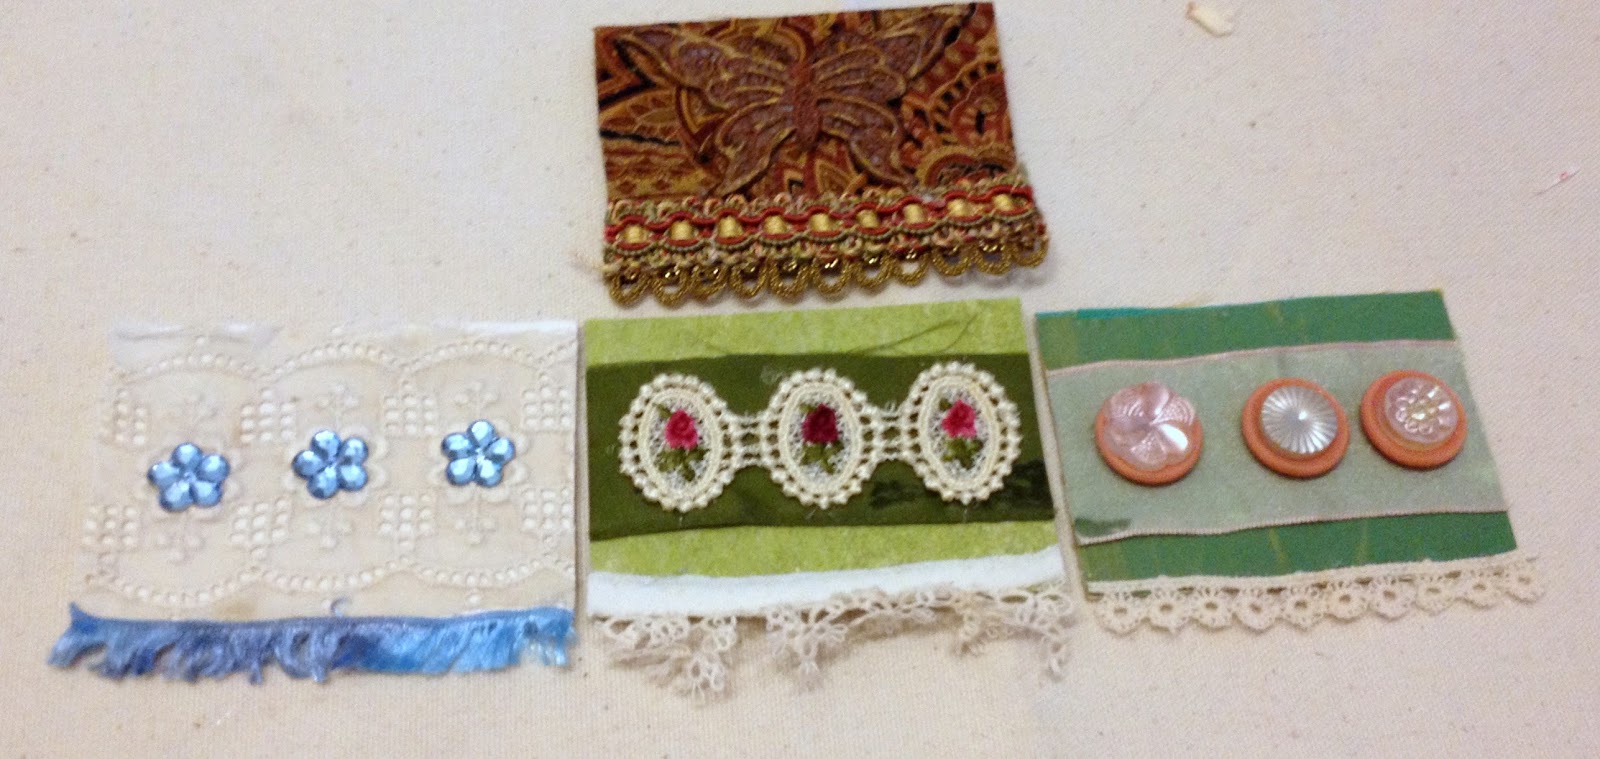
I have four done, but only because I decided I didn't really think the butterfly one goes with the others, so I had to make another one.
 Kimberly said it was up to me how I interpreted the theme, so I used a linen hanky for the background and then promptly covered it up, but the lace is promptly seen on all of them.
This is the one I created today:
 Like I said, linen hanky has background, on top of that I added a piece of wide vintage lace, some blue rhinestone flowers and some blue trim. I might go back and add a little blue coloring to the lace, I'm not sure. Compared to the other two, it's kinda dull (but only cause I'm not really a neutrals kinda gal).
These next three, I made at the same time:
 Again with the linen hanky background, on top of that is some (I have no idea what it actually is) green fiber (?) and then the edging of a green napkin, some lace I picked up at a garage sale and some tatting from an old shirt collar at the bottom.

Linen hanky background layered with some green fabric and then more green ribbon and some vintage buttons. I also added some lace to the bottom.
After making this last one, I decided I didn't like how it looked with the other two, and I'm gonna list it on Etsy.
There is a linen background, some brown/gold fabric, some very elegant looking trim and then the lace butterfly. The butterfly was originally white, so I colored it with some alcohol inks and then used some gold puff pant to accent some parts of it and tie it in with the other fabrics.

I'm thinking of wrapping them in a vintage hanky to send them on their way.